Fortunately, there are several ways to fix this annoying issue. Below are some troubleshooting tips you need to try if Word keeps opening documents in read-only mode in Windows 10 and Windows 11.
1. Check If Office Subscription Has Expired
Before you try any advanced troubleshooting tips, ensure that your Office subscription hasn’t expired. This is a popular reason for Office programs like Word may open files in read-only mode and not let you edit them. Head over to Services & subscriptions section on Microsoft’s website and sign in with your Office account to check the subscription status. You’ll find the expiration date for your Office subscription under the Overview tab. You might have to renew your expired subscription.
2. Disable Editing Restrictions for Password-Protected Files
Microsoft Word may open a document in read-only mode if the document owner has imposed editing restrictions. If you have the password for the file, you can easily remove the read-only restriction for that document by following the steps below. Step 1: Open the password-protected document in Word. Step 2: On the Review tab, click the Restrict Editing option in the Protect group.
Step 3: On the Restrict Editing pane that appears on the right, click the Stop Protection button.
Step 4: Enter the password for the file and click OK.
After verifying the password, Word will remove any editing restrictions and you can begin to modify the document.
3. Turn Off Open Email Attachments in Reading View
Another reason why Word may open your documents in read-only mode is if you’ve previously configured it to open all your email attachments in reading view. Here’s how you can change that. Step 1: Open Microsoft Word and click the File menu in the top left corner.
Step 2: Select Options from the left pane.
Step 3: In the General tab, scroll down to ‘Start up options’ section in the right pane. Untick the ‘Open e-mail attachments and other uneditable files in reading view’ checkbox and hit OK.
After you complete the above steps, Word should open all your email attachments in the default view.
4. Disable Protected View in Word
Protected View is a security feature in Word that keeps your PC safe from malicious files. When enabled, Word will open any suspicious files in read-only mode. However, if you’re confident about the legitimacy of your Word document, you can temporarily disable the Protected View feature. Step 1: In the Microsoft Word window, click the File menu in the top-left corner.
Step 2: Select Options from the left pane.
Step 3: In the Word Options window, switch to the Trust Center tab from the left column and click Trust Center Settings button on the right pane.
Step 4: By default, all three options in the Protected View tab are checked. To disable Protected View, uncheck all three checkboxes and click OK to save changes.
Following this, Word will not open your documents in read-only mode.
5. Modify File Properties
If the issue in question is limited to a select few Word documents, the read-only file attribute may be enabled for those files. Here’s what you can do to fix it. Step 1: Right-click on the Word file and select Properties.
Step 2: Under the General tab, uncheck the Read-only box in the Attributes section. Then, click Apply followed by OK.
6. Disable Preview Pane in File Explorer
The Preview pane feature in File Explorer lets you preview your files without opening them. For that, File Explorer may set your files to read-only mode. To avoid this, you can disable the Preview pane feature in File Explorer. Step 1: Press the Windows key + E to open File Explorer. Step 2: Click the View menu at the top, go to Show, and uncheck the Preview pane option.
7. Open Microsoft Word in Safe Mode
Opening Microsoft Word in safe mode allows you to access the program without any third-party add-ins. This should help you determine if the issue is caused by one of those Word add-ins. Hold down the Ctrl key and click on the Word shortcut. When Word opens in safe mode, open a few documents to check if they still appear in read-only mode. If this solves the problem, you’ll have to disable all your add-ins and re-enable them one at a time to isolate the culprit. Step 1: Go to the File menu and select Options.
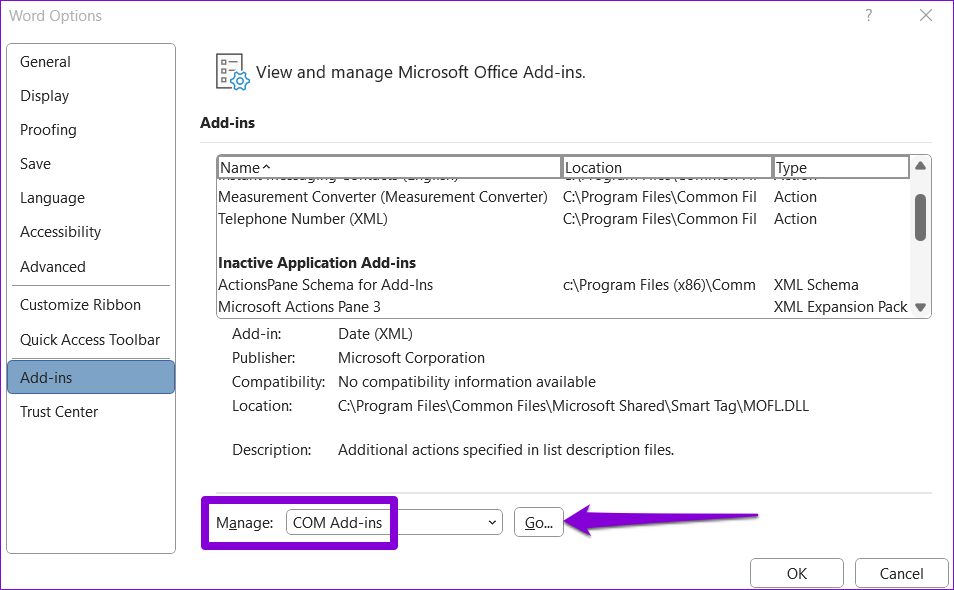
Step 2: In the Add-ins tab, select COM Add-ins from the Manage drop-down menu and click the Go button next to it.
Step 3: Disable all the add-ins and click on OK.
Restart Word after this and enable your add-ins one by one. Open a document after enabling each add-in to identify the one causing the issue.
8. Repair Microsoft Office
Microsoft provides a handy repair tool for Office suite. It can automatically detect and resolve any problems with your Office programs, including Word. You can run this tool as a last resort if Microsoft Word is still opening your files in read-only mode. Step 1: Right-click on the Start icon and select Installed apps from the list.
Step 2: Scroll down to locate the Microsoft Office product on the list. Click the three-dot menu icon next to it and select Modify.
Step 3: Select Quick Repair and click on Repair.
If the issue remains even after this, perform an Online Repair using the steps above. This will conduct a more thorough repair operation and resolve any issues with Office apps. Note that you’ll need to have an active internet connection for this to work.
No More Restrictions
When Microsoft Word keeps opening your documents in read-only mode, it disrupts your workflow on your Windows 10 or Windows 11 computer. We hope that one of the solutions has helped you fix the issue and things are back to normal. The above article may contain affiliate links which help support Guiding Tech. However, it does not affect our editorial integrity. The content remains unbiased and authentic.


