Unreliable network connection, misconfigured settings, and app glitches are just a few reasons the Mail app may interrupt you with such errors. If you can’t pinpoint the exact cause, then working your way through the troubleshooting tips below should help.
1. Use a Secure Network Connection
The Mail app may be failing to verify server identity because you’re on a public (less secure) network. Several users on the forums managed to get rid of the error by switching to a private network or cellular data. Hence, this is the first thing you should try.
2. Correct Date and Time on iPhone
Incorrect date and time on your iPhone can also hinder the connection between the Mail app and the server. As a result, the app may prevent you from exchanging emails. Instead of setting the date or time manually, you can configure iPhone to use the network-provided date and time. Here’s how to do that. Step 1: Launch the Settings app on your iPhone and navigate to General.
Step 2: Tap on Date & Time and toggle on the switch next to Set Automatically.
3. Delete and Re-Add Account
If you only face this error on a particular mail account, you can delete that account and add it back. This way, you can set up your account from scratch and fix any misconfigured settings. Here’s how you do it. Step 1: Launch the Settings app on your iPhone and scroll down to tap on Mail.
Step 2: Go to Accounts and select the email account you’re facing issues with.
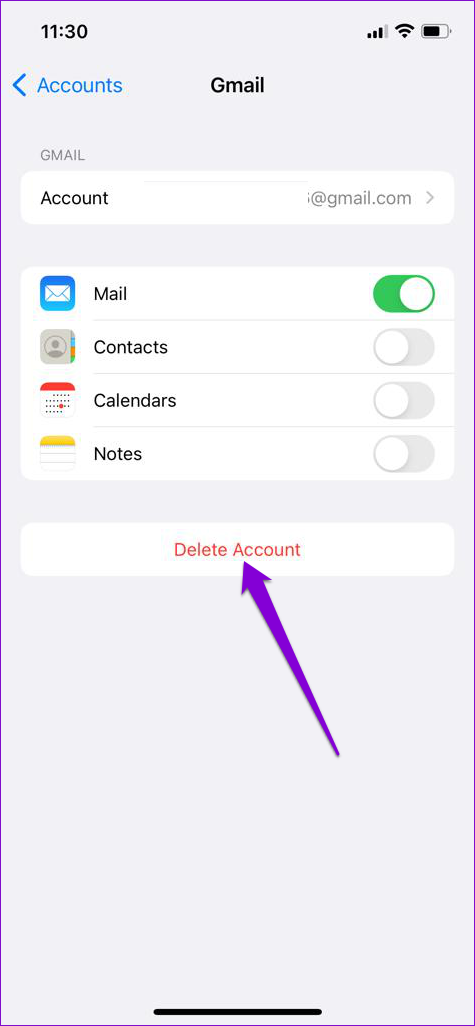
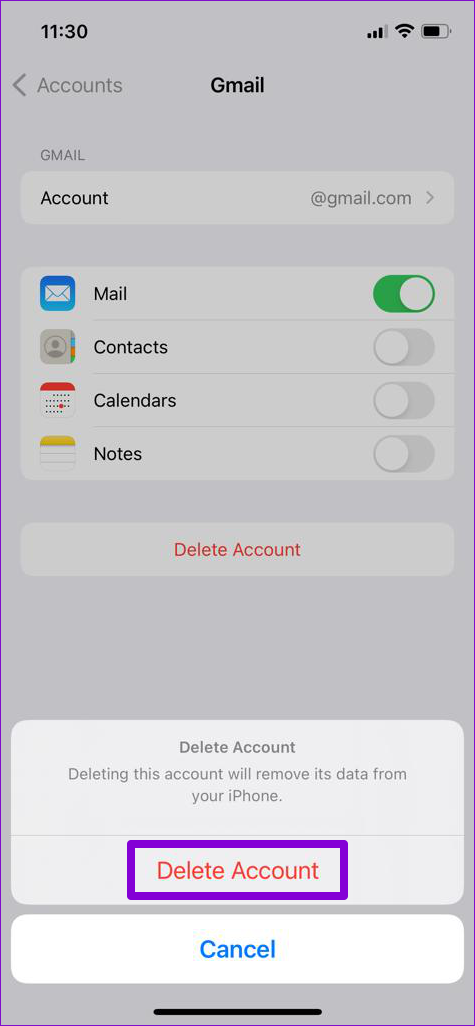
Step 3: Tap on the Delete Account option. Select Delete Account when a prompt appears.
After that, return to the Accounts page and select Add Account to log in with your account.
Try using the Mail app to see if it works fine.
4. Disable SSL Encryption
SSL (or Secure Socket Layer) encryption is responsible for encrypting the connection between the Mail app and the server. If there’s a discrepancy between the SSL certificates on your phone and one on the server, you may face a ‘Cannot Verify Server Identity’ error on your iPhone. You can try disabling SSL encryption momentarily to see if that gets rid of the said error. Here’s how. A word of caution. Disabling SSL makes your emails vulnerable to attacks. Anyone on the same network as you could potentially intercept the messages and view your username and password in cleartext. Step 1: Launch the Settings app on your iPhone and scroll down to tap on Mail.
Step 2: Go to Accounts and select the problematic email account.
Step 3: Tap on your email id at the top.
Step 4: Go to Advanced and toggle off the Use SSL option.
If this method works, make sure to enable the ‘Use SSL’ option after a while.
5. Reset Network Settings
Network-related issues can also prevent the Mail app from communicating with the server and lead to such anomalies. To fix this, you can consider resetting the network settings on your iPhone by following the steps below. Step 1: Open up Settings on your iPhone, navigate to General and tap on Transfer or Reset iPhone.
Step 2: Tap on the Reset option at the bottom and choose Reset Network Settings from the menu that pops up.
Enter your lock screen password to verify your identity and begin the restoration process. After resetting the network settings, reopen the Mail app to see if the error is resolved.
6. Install Software Updates
If you’re still bothered by the ‘Cannot Verify Server Identity’ error at this point, then it’s likely that a bug within the Mail app or iOS is responsible for it. In that case, you should install any pending iOS updates right away. That will also update the Mail app on your iPhone. To check for pending iOS updates, open the Settings menu and go to General. Then tap on Software Update.
Download and install iOS updates and check if the error reappears.
Identity Secured
Although the Mail app on iPhone is quite reliable, it may bug occasionally you with an error or two. But before you consider switching to an alternative, it’s worth trying out the troubleshooting tips above to fix the ‘Cannot Verify Server Identity’ error on your iPhone. The above article may contain affiliate links which help support Guiding Tech. However, it does not affect our editorial integrity. The content remains unbiased and authentic.
